1068
1068
However, since Getac Enterprise is highly configurable, the ability to complete tasks described in this article may be different for each User, depending on policy. Please contact an administrator with all access questions and concerns.
Overview
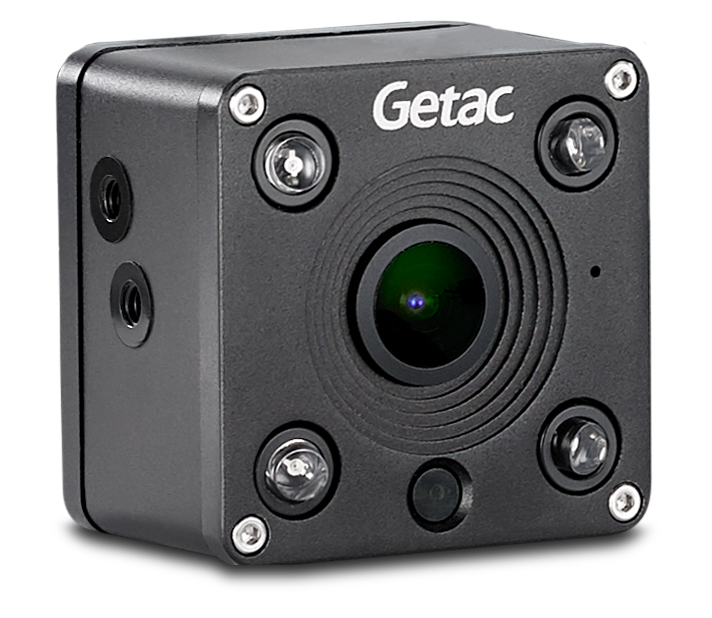
The NF21-146IR is most often used as a backseat camera with the MVS. The most common and recommended settings for this camera are below.
Configuring Video settings
Perform the following steps to configure DVRs to use an NF21-146IR Camera:
- Log into Getac Enterprise.
- Access the Unit Configuration by one of the two methods:
- Via the Detailed Unit Page.
- Via the Unit Configuration Template Page.
- Access the Devices sub-page.
- By default, the Video tab will load. This is where cameras are added and configured first.
- Click on the Add button.
See image below for an example:
Ex. Add Device Button - Add a Name, e.g. Backseat.
See the image below for an example:
Ex. Camera Name Note:The description given here will be visible in the filename of any Assets recorded by this camera, e.g. Unit1_Backseat_1_03282022151517. - From the Device dropdown menu, select IP Camera.
See image below for an example:
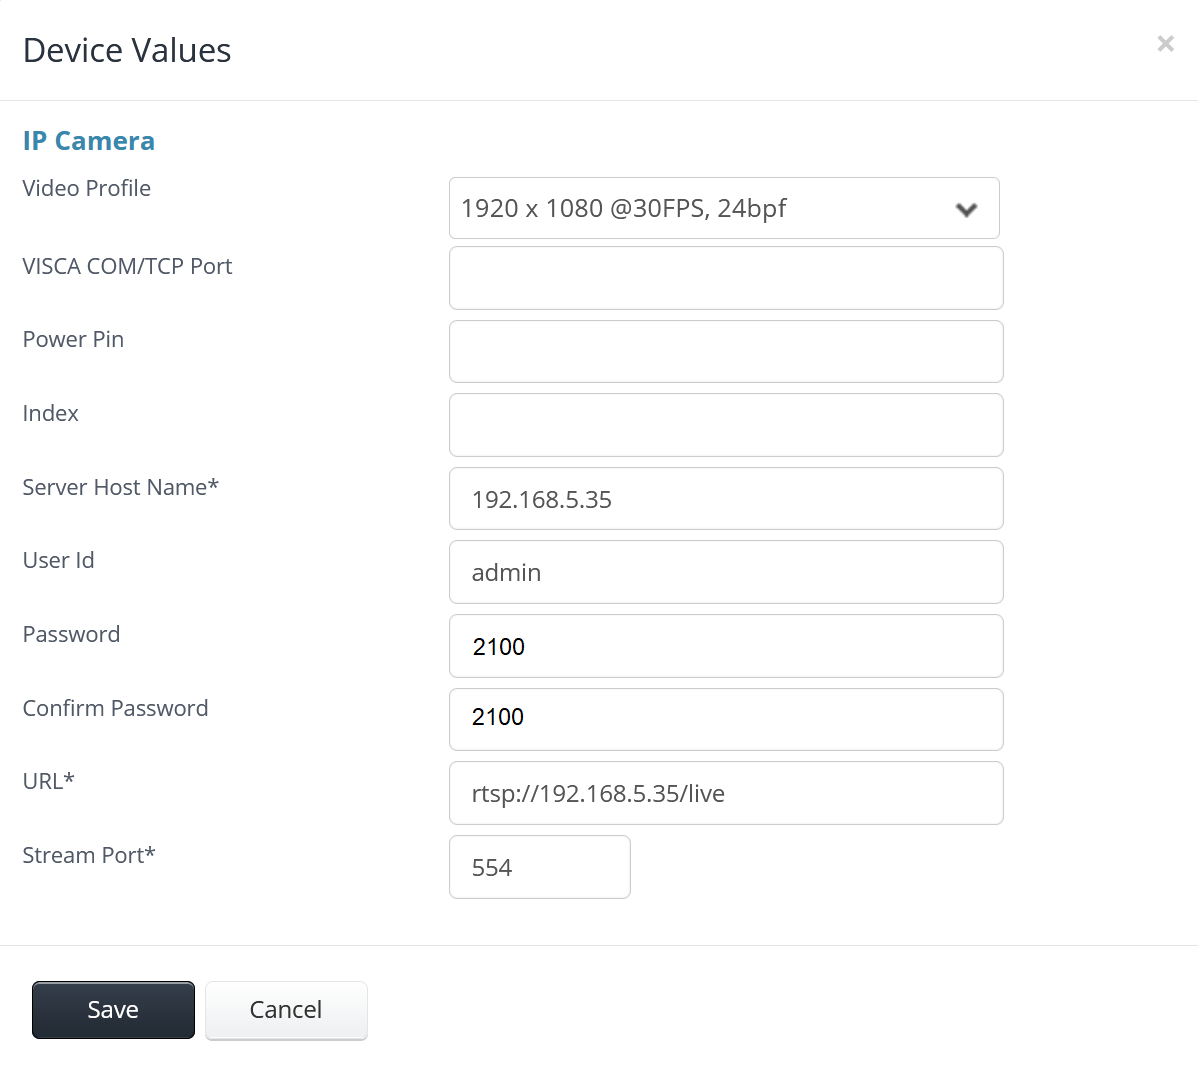
Ex. Device Dropdown - The Device Values submenu will open.
See image below for an example:
Ex. Devices Submenu - Click on the Video Profile dropdown menu and select 1920 x 1080 @30FPS, 24bpf.
See image below for an example:
Ex. Video Profile Setting - Leave the following items blank:
- VISCA COM/TCP Port
- Power Pin
- Index
- For Server Host Name, type 192.168.5.35
See image below for an example:
Ex. Server Host Name - For User Id, type admin
See image below for an example:

Ex. User ID - For Password and Confirm Password, type 2100
See image below for an example:
Ex. Password and Confirm Password Caution:- Once a password has been typed, it will be replaced by dots and cannot be revealed again.
- Passwords must match, and the settings cannot be saved until they do.
- For URL, type rtsp://192.168.5.35/live
See image below for an example:
Ex. URL
- For Stream Port, type 554
See image below for an example:
Ex. Stream Port
- Click on Save to finalize.
Example:
Ex. Save Button
Configuring Audio Settings
The NF21-146IR has a built-in microphone that can be configured to capture audio in the cabin of a vehicle.
To configure the Audio Settings for the NF21-146IR, perform the following steps:
- Click on the Audio tab to the right of the Video tab configured previously.
Example:
Ex. Audio Tab - Click on the Add button
Example:
Ex. Add Button - Give the new Audio device a name. Typically, this matches the name of the backseat camera, e.g. Backseat.
Example:
Ex. Add Audio Device Name - From the Device dropdown menu, select The name of the backseat camera, e.g. Backseat.
Example:
Ex. Select Audio Device - The Device Values submenu will open.
Example:
Ex. Device Values Submenu - Set the following parameters:
- Channel Number - 1.
- Volume - 75.
- Power Pin - Leave blank.
- Index - Leave blank.
Example:
Ex. Device Values Configuration
- Click on the Save button to finalize.
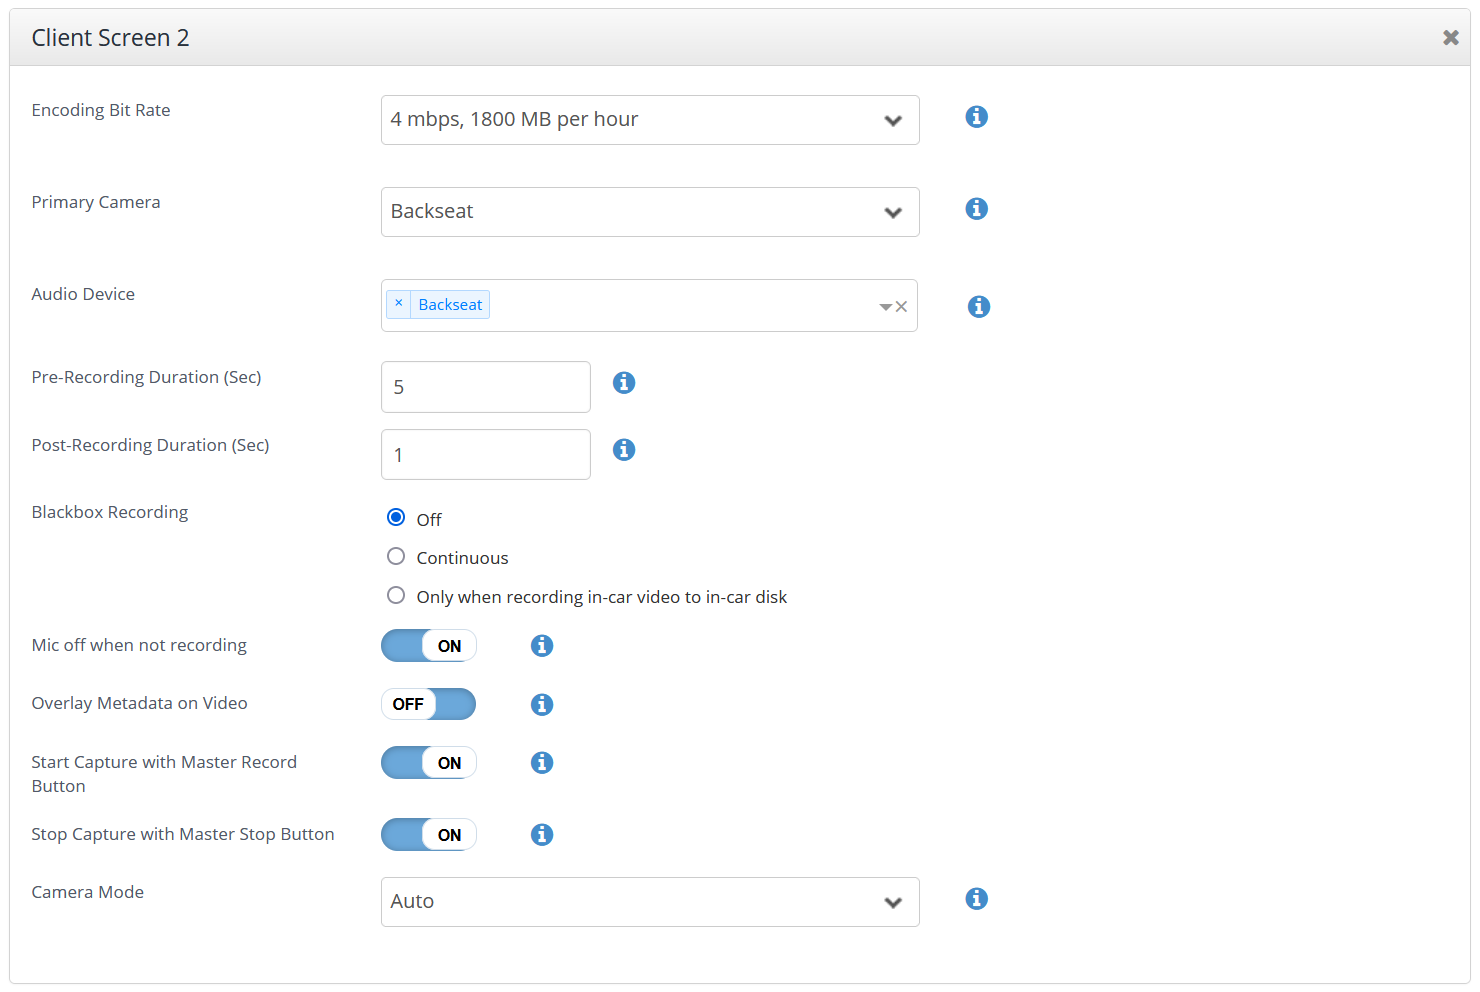
Configuring Client Screens
All Assets captured by the MVS are recorded in .MP4 format. The Client Screens tab allows for setup of the items that will appear on an Asset or recording when played back. BlackBox Recording, for one or more cameras attached to a DVR, is also configured here.
To configure a Client Screen for the NF21-146IR, perform the following steps:
- First, click on the Client Screens tab to the right of the Audio tab configured previously.
See image below for an example:
Ex. Client Screens Tab - If no Client Screens are currently created, click on the Add button to create one then, make changes to the following settings:
- Encoding Bitrate - 4 Mbps, 1800 MB per hour is the recommended setting.
See image below for an example:
Ex. Encoding Bit Rate Note:6 mbps, 2700 MB per hour can be chosen instead for better image quality however, upload times will be slower. Contact [email protected] or a Video Solutions Architect for more information. - Primary Camera - Typically set to the backseat camera or Backseat.
See image below for an example:
Ex. Primary Camera - Audio device - Typically set to the built-in microphone which will share the same name as the backseat camera, e.g. Backseat.
See image below for an example:
Ex. Audio Device Caution:- BWCs do not transmit audio back to DVR-based solutions, and consequently cannot be listened to from the MVS in real-time. In order to hear recorded audio from a BWC with video from a recorded Asset, playback all cameras at the same time from the Detailed Asset Page in Getac Enterprise.
- Pre-Record Duration - Configurable based on Agency needs.
See image below for an example:
Ex. Pre-Record Duration Caution:While the value is configurable, it is dependent on the hardware specs of your DVR model. Contact [email protected] or a Video Solutions Architect for more information.- Post-Record Duration - Configurable based on Agency needs.
See image below for an example:
Ex. Post-Record Duration Caution:While the value is configurable, it is dependent on the hardware specs of your DVR model. Contact [email protected] or a Video Solutions Architect for more information. - BlackBox Recording - Off by default, choose one of the below options and provide the directory where BlackBox Recordings will be saved.
- Off - Disabled.

Ex. BlackBox Off - Continuous - Enabled at all times that the system is powered on, i.e. vehicle ignition is on.
- Blackbox Directory - Only appears if selected. Enter D:\Blackbox for the directory.

Ex. Continuous BlackBox
- Blackbox Directory - Only appears if selected. Enter D:\Blackbox for the directory.
- Only when recording in-car video to in-car disk - Enabled only when an active recording is in progress.
- Blackbox Directory - Only appears if selected. Enter D:\Blackbox for the directory.

Ex. BlackBox Only While Recording
- Blackbox Directory - Only appears if selected. Enter D:\Blackbox for the directory.
- Off - Disabled.
- Mic off when not recording - On by default, this mutes audio capture during pre-record when the system is not actively capturing video.
 Note:If audio capture during pre-record is desired, turn this setting off.
 - Ex. Overlay Metadata on Video Overlay Metadata on Video - Off by Default, this setting writes GPS and Date information directly onto the image of a recorded Asset.
 Caution:This feature is only supported on legacy Cameras.
 - Start Capture with Master Record Button - On by default, this setting begins recording all cameras if the Master Record Button on the CU-D50 is pressed.
- Stop Capture with Master Stop Button - On by default, this setting stops recording all cameras if the Master Stop Button is pressed and held on the CU-D50.
- Camera Mode - Auto by default, this setting specifies which mode the Camera will default to.
- Auto - Switches between Day/Night modes automatically based on the amount of ambient light detected.
- Day - Maintains settings that are best for daytime conditions.
- Night - Maintains settings that are best for nighttime conditions.
- IR - DO NOT USE. For legacy cameras only.
- Once all parameters are set, click on the Save button to finalize.
- Post-Record Duration - Configurable based on Agency needs.
Recommended Settings
While many different configurations are possible to accommodate different use cases or scenarios, the most commonly used configuration settings for the NF21-146IR are as shown below:
Video Tab
Audio Tab

Client Screens Tab