Mar 07, 2024
 715
715
Note:
This article showcases features that are typically only made available to Administrator roles.
However, since Getac Enterprise is highly configurable, the ability to complete tasks described in this article may be different for each User, depending on policy. Please contact an administrator with all access questions and concerns.
However, since Getac Enterprise is highly configurable, the ability to complete tasks described in this article may be different for each User, depending on policy. Please contact an administrator with all access questions and concerns.
Overview
To edit the details for a Station, perform the following steps:
- Navigate to the Main Stations Page.
- Check the box next to the Station.
- Click on the Wrench Icon.
- Make changes to one or more of the following sections:
Warning:
Changes made to the Stationsettings can impact all Units and Users. Contact [email protected] if unsure about settings BEFORE making a change.
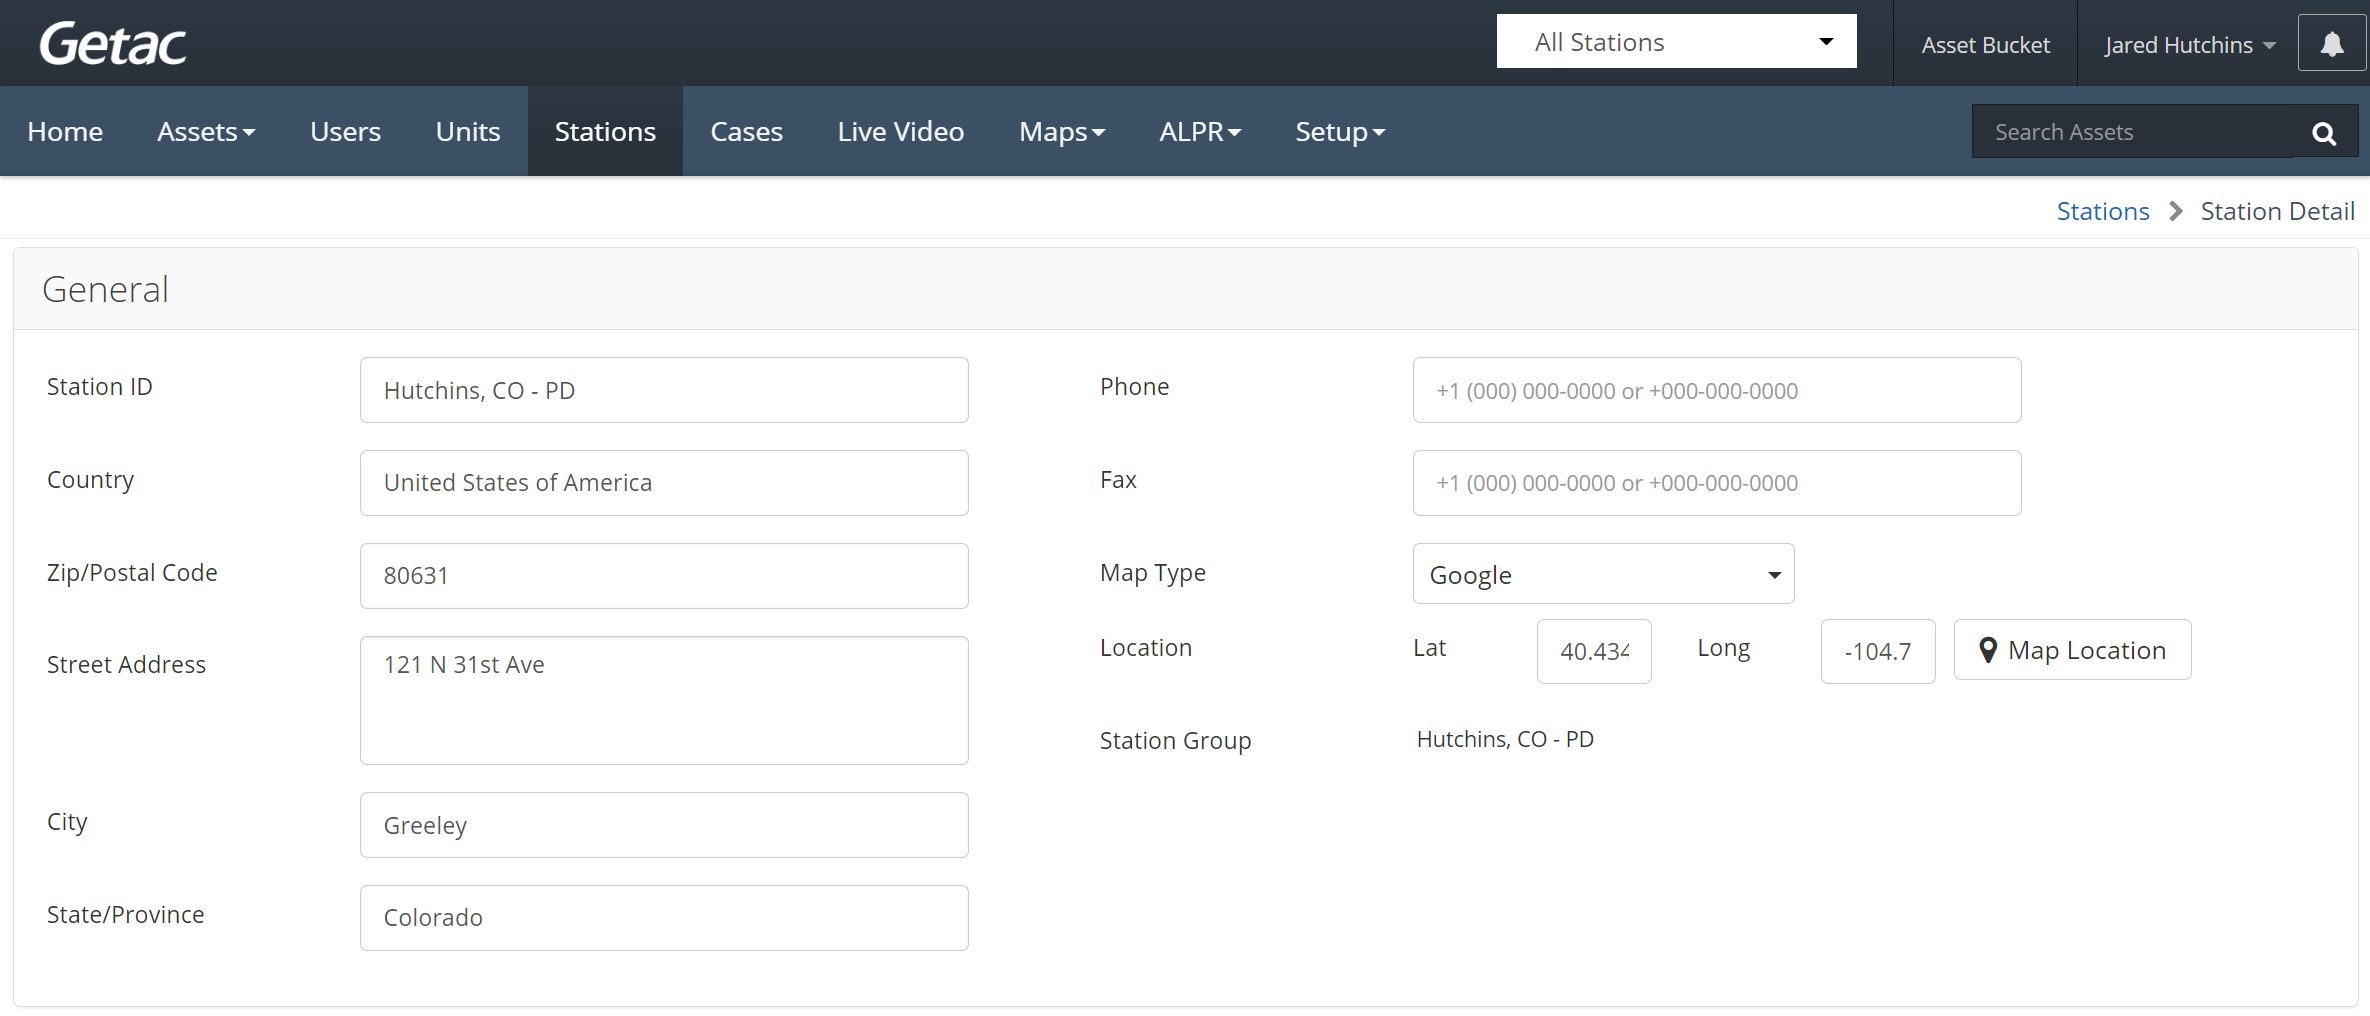
General
- Station ID* - Station Name.
- Country* - Where Station is located.
- Zip/Postal Code*.
- Street Address.
- City.
- State/Province*.
- Phone.
- Fax.
- Map Type - Google or Bing (Google is recommended).
- Location* - Latitude and Longitude, or click on Map Location to manually drop a pin on the desired location.
- Station Group - Informative only. Which Station Group this Station belongs to.
*Note:
Denotes a required field.
See the image below for an example:

Retention/Upload Policies:
- ALPR Captures* - Leave at default value.
- ALPR Notifications* - Leave at default value.
- BlackBox Retention - Set which retention policy is applied to BlackBox Recordings.
- Uncategorized Assets - Set minimum Retention period for any Assets that have not been categorized.
- Upload Policy - Set Upload Policy for Uncategorized Assets.
*Note:
ALL ALPR features are no longer supported in Version 3 Getac Enterprise.
See the image below for an example:

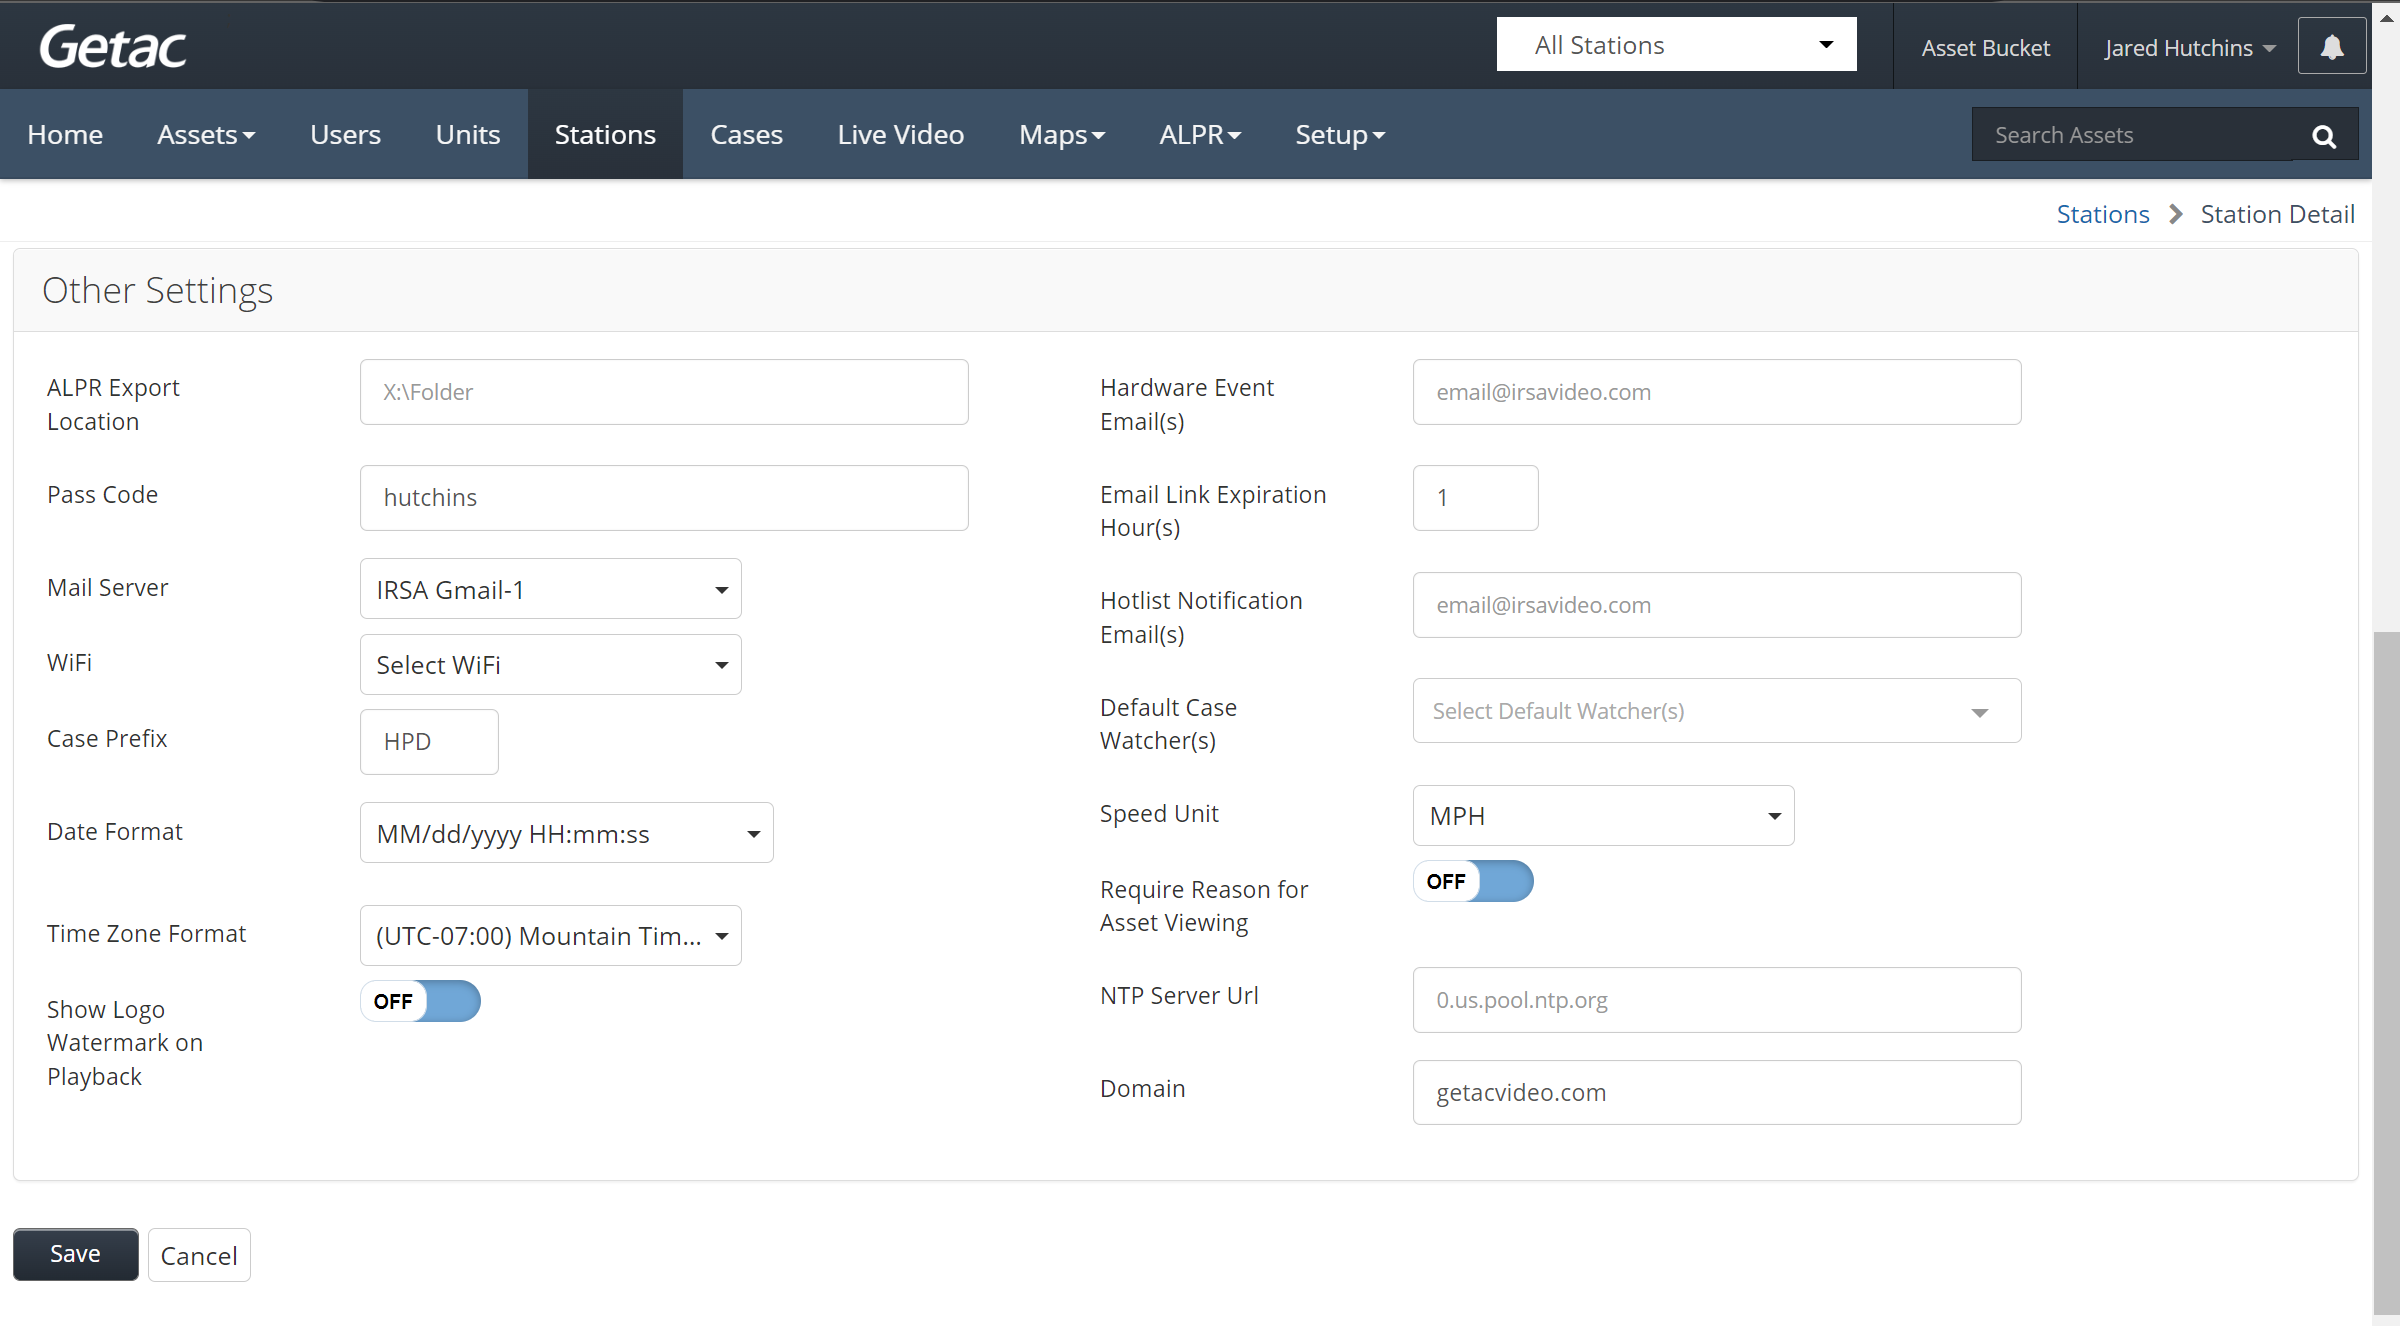
Other Settings:
- ALPR Export Location - DO NOT USE.
- Pass Code* - Used for InCar and MasterDock registration to Getac Enterprise. Must be between 3–17 characters.
- Mail Server* - Specify which configured email server will be used to send emails for the Station.
- WiFi - Specify which Wi-Fi connection is set as the StationWiFi setting on the Upload Policy page.
- Case Prefix - Enter a 3 letter prefix that will appear before the auto-generated case ID.
- e.g. {prefix}-YYYY################.
- Date Format - Set which format the date and time will appear throughout Getac Enterprise, as well as the InCar and MasterDock applications, such as:
- Month, Day, Year, AM/PM (MM/dd/yyyy hh:mm:ss tt).
- Month, Day, Year, 24 hour (MM/dd/yyyy HH:mm:ss).
- Year, Month, Day, AM/PM (yyyy/MM/dd hh:mm:ss tt).
- Year, Month, Day, 24 hour (yyyy/MM/dd HH:mm:ss).
- Day, Month, Year, AM/PM (dd/MM/yyyy hh:mm:ss tt).
- Day, Month, Year, 24 hour (dd/MM/yyyy HH:mm:ss).
- Time Zone Format - Select the appropriate Time Zone that will be used to display time information in the system.
- Show Logo Watermark on Playback - Displays the Getac logo watermark in the bottom left corner when viewing assets in Getac Enterprise, the Asset Player or Multi-View Player.
- Hardware Event Email(s) - Specify the email address that hardware event warnings for Units associated with the Station will be sent to. This email address is also used for the Speed Event Email Notification.
- Email Link Expiration - Editing this field will set the Default expiration in hours for emailing Assets for this Station.
- Hot List Notification Emails - DO NOT USE.
- Default Case Watcher(s) - Select which User Groups automatically receive email notifications of Case updates.
- Speed Unit - Set which format speed information will appear throughout Getac Enterprise and the InCar application. Available formats include:
- Kilometers per Hour (KPH).
- Miles per Hour (MPH)
- Require Reason for Viewing - Enabling this option forces all Users to enter a reason for viewing an Asset.
- NTP Server URL - for custom NTP server.
- Domain - For OpenID config/AzureAD InCar Asset mapping.
See the image below for an example:

Save
Once any/all changes have been made, click the save button to finalize.


